
Hello everyone... I am Rebecca from Making Rebecca Lynne and I am so very excited, and flattered, to be a guest on Lily's Quilts! Just imagine me blushing as I say that...thank goodness this is all over the computer. Wink.
I've been invited by Lynne to share a tutorial on creating a Kona Solids Palette Layout. With some basic computer savvy you can quickly draft up your palette and use it to finalize which Kona Solids you are going to need for the Dead Simple QAL. Creating a layout is a great way to finalize your palette choices or to determine the layout of your quilt. Just heed my warning, this can quickly become an addiction!
This will not require any fancy software and instead will utilize programs most of us use on our computers everyday - all it requires is a web browser, Word or Pages, and the patience to read my tutorial. Ha! I have tried writing this tutorial as a step by step guide keeping in mind that everyone has different computer skills. I've included visuals wherever possible. For those of you who know your way around a computer pretty well this should be straightforward. Feel free to use the images to skip ahead to the parts where you may be fuzzy.
Step 1: Palette Ideas
An excellent place to start is with your idea, or ideas, for your palette. I myself had multiple palettes I was choosing between which is what led me to go to the source before making my decision. The source being the Robert Kaufman website, and more specifically, the Kona Solids page. By looking for the colors of each palette I was able to narrow down my choice to the palette which the Kona Solids best suited. If anyone interested in the Dead Simple Quilt QAL is hesitating due to palette deliberations feel free to visit my own palette conundrum here - I'm sure you will feel much better after seeing the palette mess I got myself into!
Should you be lucky enough to own one a Kona Solids Card (mine is on backorder...drat) is also a great place to start. Once you have decided your palette using the card simply proceed to the Kona Solids page and hunt down your choices.
No palette ideas whatsoever? No problem! I guarantee that once you visit the Kona Solids page the natural fabric lust that all quilters share will kick in. If that is too overwhelming you should refer to Lynne's post about generating some palette ideas utilizing some fun online tools.
Step 2: Gathering Your Virtual Swatches
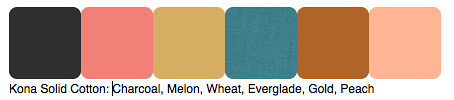
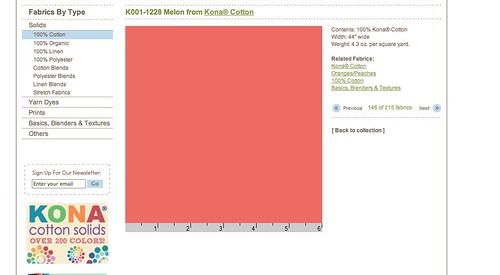
Once at the Kona Cotton Solids page (be sure you are viewing 100% Cotton if that is what you are choosing to quilt with, refer to top left navigation box) find your colors. Next, you are going to save the color swatch image for each color in your palette. In my example I will use Melon (one of my new favs) which you can see on the multiple product page below:
 |
| Melon Swatch: 2nd Row, 2nd in from Left, as seen on multiple product Kona Solids Page |
- Place your cursor over the color swatch.
- PC users Right Click and select Save Image. I suggest naming them and saving to your Desktop so that they are easy to locate.
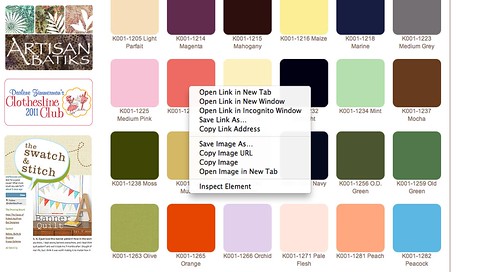
- Mac users Drag & Drop the Image onto your desktop or a blank document in Word or Pages
- Continue this step for each color.
Step 3: Adding the Swatches to a Document
After all of your color swatches are saved you may leave the Robert Kaufman site and proceed to a blank Word or Pages document. This is where you are going to add your swatches and create your layout.
- Word: Go to Insert, Picture, From File, and choose the swatch from your desktop

- Pages: Drag & Drop or Cut & Paste your images into the blank document from your desktop
- Repeat this step with each color until all of your swatches are on the document.
Step 4: Formatting
Formatting sounds like a big scary word but it doesn't mean anything fancier than telling the software to let you play with the images you've added! So quick and easy here we go...
Your images are probably large on the page right now and all stuck together...so we will need to shrink them down a bit to get them all to play together well!
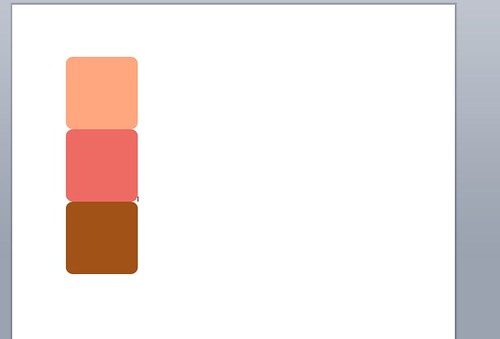 |
| Stuck Together on Page |
- Word:
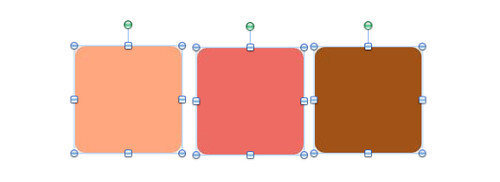
- While holding down the Shift key click on each of your swatches so that they are highlighted. Should look like this:
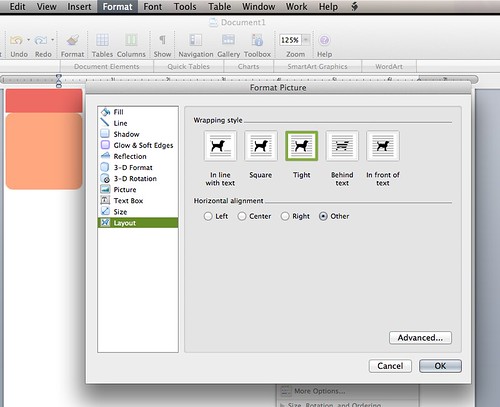
- Next go under Format > Object > Layout and choose Tight (default is usually In Line with Text which won't allow you to move the swatches easily on the page)
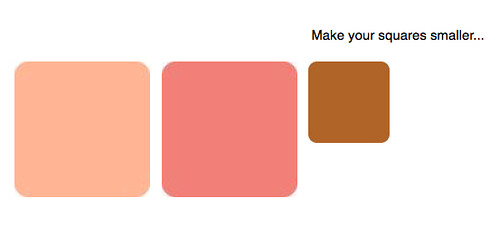
- Resize every swatch by placing your cursor on the corner of the swatch and dragging it towards its center to make it smaller. Choose a manageable size to allow you to have multiple swatches for your layout. [I chose 1"]
- Pages:
- While holding Command key (the one right next to keyboard) click on each of your swatches until they are all highlighted. Or Select All using Command+A. It should look like this:

- Using Inspector go under Wrap > Select In Background, Background Objects Selectable and be sure to deselect Object Causes Wrap (should look like image below)

- Resize every swatch by placing your cursor on the corner of the swatch and dragging it towards its center to make it smaller. Choose a manageable size to allow you to have multiple swatches for your layout. [I chose 1"]
Whew, got through formatting. Finally the fun part! Now that you have your swatches on the page all formatted nicely you can start making decisions about layout. To create additional swatches to use as blocks in your layout simply Copy & Paste the swatch you'd like to replicate and voila, you have more to work with. If your swatches need to be reformatted then return to Step 4 and follow instructions for each swatch.
- Word: When you Copy & Paste a formatted swatch the copy remains formatted
- Pages: Unfortunately, when a swatch is Copied & Pasted in Pages the formatting reverts to the default formatting for the copy. But - in Pages you may Select All (Keyboard Shortcut = Command+A) and reformat all of the swatches at the same time.
 |
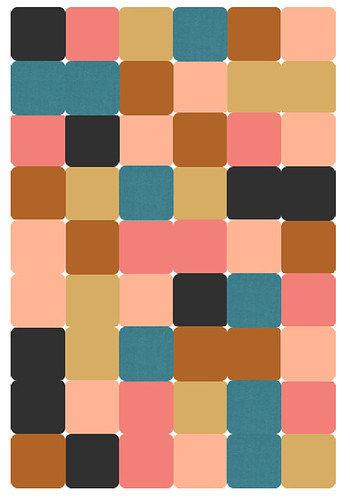
| Making Rebecca Lynne's Flora Inspired Palette Under Construction |
Step 6: Sharing on Flickr
This is the most important part! Now comes the time to brag about your amazing palette by posting it on Lily's Quilts Flickr Account to share with the rest of us! If you have a PDF creator, such as Preview on Mac, you can open on Preview and convert the document to a jpg, png, or tiff. Otherwise, as a shortcut, simply take a screenshot of your palette and create a jpg immediately!
- PC: Alt+PrtScrn
- I'm embarrassed to admit I've never done a screenshot on my PC! But, thank goodness for Google. I found instructions you can easily follow for various versions of Microsoft here.
- Mac: Command+Shift+4
- Hold down these keys and watch your cursor convert to a little bullseye with a cross inside circle thingy (very technical description I know)...simply drag it across your image and you will see box form...once you let go of the keys a screenshot will be added to your desktop. Easy!
Again, thank you to Lynne for letting me share this geeky computer stuff! Should you have any questions, about the Tutorial or about other computery thingamajigs, feel free to leave a comment below or contact me directly. If you'd like to learn more about me, my modern quilting, or my computer tomfoolery I love a good visit! But, most importantly I hope you will have fun creating your layouts!
Please visit here to Download the Kona Solids Palette Layout Tutorial.
Please visit here to Download the Kona Solids Palette Layout Tutorial.
Great post, Rebecca, very clear and easy to follow! Congratulations on your guest spot!! *Skipping and clicking heels with excitement on your behalf!*
ReplyDeleteOh looking forward to trying this out
ReplyDeleteJust tried it out! Fantastic! The only problem is that now I want to rethink all my palette choices. Sheesh! Thanks for that!
ReplyDeleteOh I hope I can find time to do this!
ReplyDeleteThis is wonderful! Is there a way to print this so that I can follow the directions more easily? Thanks
ReplyDeleteCarol
Thank you for this tutorial, it is clear and easy to follow and now I have to give it a try.
ReplyDeleteCarol - Great suggestion! I actually have a typed up copy of this post...so if you'd like me to email you a PDF I'd be happy to!
ReplyDeleteThat is a rockin' tute! I love learning new techy trix. Thank you!!!
ReplyDeleteGreat job Rebecca! You have almost inspired me to start a completely new project! :)
ReplyDeleteRebecca, I'm having so much fun with this tute. Many thanks for the easy-to-follow directions. Lynne knows a good thing when she sees it!
ReplyDeleteAwesome tutorial, thank you so much for going to all the trouble to write everything out clearly.
ReplyDeleteThis comment has been removed by the author.
ReplyDeleteThank you so much for this post and your very clear instructions. I've had great fun creating my palette. I can't wait to get started.
ReplyDeleteThanks for the wonderful tutorial. Can't wait to get started!
ReplyDelete